Tuesday, November 13, 2007

Collage in the Journal

Journal Fodder is the food for your journal, and when you feed your journal, it gets fat. So, when you glue something in, you want it to stay in. We hear all the time about how stuff falls out even when using quality adhesives.

First of all, no product is perfect, but by simply following some simple steps, you can increase the chances that the fodder will stay in the journal. It is amazing how many people simple spread a little glue and slap it in. No wonder so many people have stuff falling out.

We use primarily UHU Glue Stics to glue in the majority of our fodder. These are high quality, acid-free glue sticks. We occasionally use gel medium and Yes Paste to glue in more difficult items.

Here are some steps to gluing in fodder.
1. Trim the collage element to size.


2. Flip the collage element over onto a scrap paper. This keeps your work area clean, and allows you to spread glue to the edges.

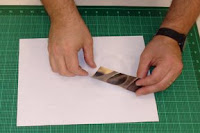
3. Spread glue on the back of the collage piece. Spread the glue right off the edge of the collage piece onto the scrap paper. Press firmly with the glue stick and spread glue over the entire back. Sometimes the paper will curl a bit. Allowing the glue to dry on the scrap paper allows you to reuse the paper again and again giving you dedicated glue papers.

4. Place the glued fodder into the journal. You can reposition the piece if needed.


5. Rub the glued piece with your hand for about a minute to make certain that it is well adhered. You may want to place another scrap of paper over the piece in case glue oozes out.

As you glue more fodder into the journal, it will get considerably thicker and heavier. Often you need to reinforce the binding so that the journal does not fall apart.

Tuesday, October 16, 2007

Covers

Personalizing the cover of the journal can be easily done with stickers, collage, or paint. We prefer to plaster the cover with stickers that we get from various places. Someone once remarked that the journals are like the old steamer trunks with their labels of the places they've been.

And so, the cover of the journal can become an extension of the journal and the journal keeper by containing evidence of places, personality, and interests. So think about how the cover of your journal reflects the person you are.

Thursday, October 4, 2007

NCCAT: Heaven on Earth


The North Carolina Center for the Advancement of Teaching (NCCAT for short) is truly heaven of earth for educators in North Carolina. It is a state funded institution dedicated to the professional development of North Carolina educators. We have had the honor of teaching week long seminars on the visual journal there for the past two years with an invitation for a third in February, 2008. NCCAT is truly a retreat setting nestled in the mountains of the western part of the state near Cullowhee where educators get a truly remarkable opportunity and are treated as true professionals. We feel privileged to be a small part of what they do.

The above two page spread was created during and shortly after our first visit to the center as seminar instructors. The postcard in the upper left shows NCCAT's main building, and as with most of my pages, this started with an initial layer - a draft of the week's schedule.

It is a remarkable place. I wish that every state could have a center like this dedicated to moving education forward.

Monday, September 10, 2007

Solvent Transfers

It has been a while, so I thought that I would make time to actually log on and and post something new.

Below are directions for creating solvent image transfers. These transfers are a great addition to the journal. Since it involves using solvents please read all cautions, warnings, and advisories not only in this tutorial, but on the label of the chosen solvent before beginning.


Xylene, acetone, and Citrasolv® are several chemicals that will transfer photocopies, laser printed, and magazine images. All of these images are toner-based. This transfer technique will not work with ink jet images, and despite many homes and offices having all-in-one scanners, printers, and copiers, these devices are usually glorified ink jet printers. Of all these chemicals, xylene seems to works the best for us. Caution: All these chemicals are very volatile and toxic, and they evaporate quickly. They must be used in a well-ventilated area. Xylene will melt plastic so use caution, and do not try to store in a plastic container.

Materials
Xylene containing product (Goof Off®, Oops®, Chartpak® Blender Pen), acetone, or Citrasolv®
Photocopied (b&w or color), laser printed (b&w or color), or magazine image
Burnisher – wooden or metal spoon
Glass container
Old rag
Receiver surface – journal
Blotter paper or newspaper


Procedure
1. Select an image. With photocopies and laser prints, the fresher the print, the better, and place the image face down on the receiver paper. You may want to place blotter paper or newspaper under the receiver paper because the chemical can soak through several layers of paper.


2. Soak the back of the image with the chosen chemical product with a paper towel or sponge. Simply dip the towel or sponge into some of the chemical (you may have to pour some of it into a glass jar). With the blender marker, simply color the back of the image with the marker.If the chemical has pooled, allow it to sit for a moment. Acetone evaporates very quickly, so work fast.


3. Use a wooden spoon or metal burnisher to rub the back of the photo. Use a firm and even pressure. Xylene melts plastic; so do not use a plastic spoon or burnisher.


4. Lift a part of the image to see how it has transferred. Burnish the photo more or apply more chemical if necessary.


5. Pull off image to reveal transferred image.


Warning: These chemicals should only be used in a well-ventilated area. Read all labels and warnings before using. Since magazine images have images on both sides, special caution is necessary. When using magazine photos, soak the receiver paper first with the chemical before placing down the image, and use a scrap paper to place on back of the magazine image before burnishing. This will keep the mess to a minimum.

Friday, July 13, 2007

Layers

As with most of my pages, this page is the result of many layers being built up over time. It began with watercolor pencil, and over several months I slowly added more and more layers of various media and techniques. The final layer was acrylic paint.

The theme of this page did not come for a while. I never have a preconceived notion about how I want a page to turn out. It's really about the process of working in the journal, building layers, and adding meaning when it seems fit. The theme of Memory came after I began to think about what my art is all about. The more I thought about it, the more I saw the build up of layers, the collage, the transparencies, and overlapping forms as similar to the way I mentally see thoughts and memories. I experience memories and thoughts in an "all-at-once" fashion. Words, images, colors, events, names, faces, and such come at me simultaneously. I rarely remember things like a film running through my mind.

So this piece has physical layers and psychological layers as well.

Friday, July 6, 2007

The Journal Fodder Junkies Strike Again

Recently we had the pleasure of providing a week long workshop to a group of teachers at the Content Teaching Academy on the campus of James Madison University in Harrisonburg, Virginia. For most of the week we worked with a group of 12 individuals. Most were art educators, but we also had one music teacher, one math teacher, and one college administrator. But on two occasions during the week, we presented to two other groups - a group of English teachers and a group of Elementary teachers.

The week was a resounding success, and we believe that we have turned a few more people into Journal Fodder Junkies. It was nice working with a single group for most of the week where we shared techniques, strategies, and ideas. Most people seemed to really just enjoy the time to work and to be creative. For a lot of people, there seems to never be enough time to do such important work.

Increasingly we seem to be getting people interested in what we do, so we are increasingly providing workshops, seminars, and presentations to groups of teachers and artists a like. We're even working on a book, and hopefully soon we will be shopping it around to publishers.

Wednesday, June 20, 2007

Packaging Tape Transfers

Ordinary, clear packaging tape can be used to make quick image transfers of newspaper, magazine, photocopied, and black and white laser printed images. It works to some degree with color laser printed images.

Materials
Clear packaging tape
Newspaper, magazine, photocopied, or b/w laser printed image
Scissors
Burnisher
Bowl or small tub of water
Sponge (optional)
Glue stick or acrylic medium

Procedure

1. Cut the chosen image to desired size. Cutting straight edges allows for more control.


2. Pull out some tape. If the sticky side is up, static electricity will hold the tape flat to the work surface. This also allows greater control and fewer wrinkles and air bubbles


3. Cover the image with tape. With the sticky side of the tape facing up, the image has to be placed onto the tape. This technique seems to create fewer wrinkles.


4. Trim excess tape. This keeps your transfer from sticking to things as you work.


5. Smooth out the tape using a burnishing tool to make certain that the image is adhered to the tape.


6. Soak the image in water for at least a few minutes. Warm water works well, but cold water is fine if you soak it longer.


7. Remove the image from the water, and place it tape side down. Gently rub the back of the image with your finger to begin removing the paper. Soak longer if needed. Continue to rub gently to remove all the paper. Sometimes a sponge can be used effectively. The image should be completely transparent.


8. Allow the transfer to dry. Using a paper towel or rag will speed the drying time, but be careful, the tape may still be very sticky.


9. Spread glue stick on the back of the transfer (the sticky side). Acrylic medium can also be used if gluing to a non-paper surface. Using a scrap of paper allows the work surface to stay clean.


10. Press the transfer onto the desired surface, and rub with hand to make certain that it is well adhered.

Monday, June 11, 2007

Construct, Deconstruct, Reconstruct

Original Drawing
This is a fun technique. I created a blind contour drawing of myself (above) while looking in the mirror using pencil on bristol board. I then traced the drawing with Sharpie and embellished some of the lines. It's a rather interesting image, but I wanted to have a bit more fun. So I scanned it into the computer and printed out a copy. Then I cut it up into random, straight-edged pieces. I then assembled the pieces into a new configuration in my journal trying to line up random lines. Needless to say, I was not trying to put my portrait back together. I then used a black pen to connect lines from different pieces in order to create a new drawing(below). I'll add more media later - probably watercolor pencil, collage, and such.

Reconstructed Drawing

Thursday, June 7, 2007

Encountering the Blank Page: Part 4


Another way to encounter a blank page with low anxiety is through page alteration. This is just simply the manipulation of the page in various ways. Below are just a few ways to physically alter a page before journaling on it.

Fold.
The simplest page alteration is folding a page. A simple fold creates instant interactivity because everyone will want to see what is behind the fold. Folds are good for “hiding” things, making areas of surprise, and bringing another level to the journal

Tear and Cut. Tearing and cutting the edges of pages creates interesting interactions between pages. A series of torn or cut pages can be visually and psychologically interesting.

Singeing.
Burning the edges of pages with a candle or lighter is another way to alter a page. Always be careful when using flames. You do not want to set your journal or your workspace on fire.

Doors, Windows, and Holes. Just as with a fold, a door adds instant interactivity because everyone will open it and look. A door can simply be a folded page or a blank card glued to a page. A door can be cut into a page so that it reveals something of another page. Or a door can be quickly made from a single piece of paper using a hobby or utility knife. Windows and holes in pages give a glimpse into other pages and create relationships between pages. Using a hobby or utility knife and cutting mat, you can quickly cut holes and windows in pages without cutting into other pages.

Pop-ups. Pop-ups create areas of surprise and fun. Simple pop-ups can be created with folded paper. There are many wonderful resources that can help in learning how to create pop-ups. One of the best is The Elements of Pop-Up by David A. Carter and James Diaz.

With the above journal spread a fold and a cut window were made in the same page.

Fold - Notice the hard line where the white touches the blue. This page has been folded in half. It even divides the letter "N" in the word "FIND".

Cut - This mask-like image is actually on the back of the folded page. A window has been cut to show it. Strips from a map frame the window.

Monday, June 4, 2007

Encountering the Blank Page: Part 3

Another way to begin pages without much thought is simply by drawing. As soon as some people hear the word "draw", they tighten up and say, "I can't draw a straight line." But the truth is that everyone has the ability to draw, and once people can accept that and accept the fact that it doesn't need to be a photo-real type of drawing, drawing can be fun and easy. Besides, many people can draw better than they think, and as with any skill, the more you practice, the better you become. As with all art, it is best to suspend judgement and enjoy the process. Use pencil, pen, marker, or crayon.

Below are several ways to begin drawing in the visual journal and to take the fear away from the blank page.

Random Lines

Without thinking about it too much, divide the page into several large areas by drawing several lines so they cross the entire page in any direction. Fill a page with a variety of one shape or multiple shapes. Simply “take your pencil for a walk” around a page by allowing your hand to slowly meander around the page allowing your lines to overlap. Set up a little game with yourself by setting limits to the types and amounts of lines and shapes you use. Do not worry about using a ruler or compass. Simply draw freehand, and turn off the inner critic that calls for you to do it right and perfect. Find the joy of making simple marks.


Tracings and Stencil

Tracing is a very simple way to add drawing to a page. Trace your hand. Trace your foot. Trace flat, interesting objects like scissors, tape rolls, and wooden spoons. Trace letter and shape stencils. Trace tools such as protractors, triangles, and French curves to draw particular shapes.


Doodles

How often have you found yourself doodling while talking on the phone, sitting in a meeting, or waiting for someone? Doodling is a great to use in the journal. Its unconscious nature is a unique way to begin a page, and you can keep a record of your unconscious thoughts. The images and words that emerge while doodling can spark more complex ideas and pages.


Blind Contours

Blind contour drawings are done by looking very closely at an object and without looking at the drawing. Your eyes stay trained on the object looking very carefully at the edges – edges of the object itself and edges of features and elements within the object. Place your journal on a table, turn your chair away from the table so that you can put your drawing hand in a comfortable drawing position slightly behind you, and hold an object in your other hand. Look carefully at the object for a few moments focusing on the edges – the contours. Pick a spot where it makes sense to begin, and place your pencil or pen on the paper. Begin to trace the edges of the object with your eyes going very slowly, and allow your pencil to follow along recording the movement of your eyes along the object. Go very slowly allowing your eyes to follow the contours of the object and allowing your hand to move along the paper. The key is not looking at the drawing. You are training your eyes to observe very closely and your hand to record those observations. Keep going until you have “traced” all the contours of the object and within the object. If you find that your pen or pencil goes off the page, simply place it back on without looking at the page. Once you are finished, look at the drawing. If you have gone slowly and not looked at the drawing, your drawing should not look like the object you were drawing. Since you did not look at the drawing, you had no way to judge size and proportion in your drawing, and that is the way these drawings are suppose to look. Some people are horrified at the results because it doesn’t look like the object. Yet these can be wonderful and beautiful drawings when you accept the process. Silence the inner critic that says that these drawings are bad or ugly or “messed-up.” The purpose of this type of drawing is to look very closely at the object and to train yourself to really see the object, and in turn improve your observational drawing skill. Try several of these on one page perhaps turning the book every time you begin with a new object. The overlapping lines make for a great basis for a page.


Continuous Contours

Continuous contours are done by sitting normally at a table so that you can see your journal page and the object you wish to draw. Setting the object in front of you is probably the easiest way to begin. Look carefully at the object for a few minutes to begin noticing the contours or edges of the object and within the object. Pick a spot to logically begin, and place your pen or pencil on the page. Allow your eyes to follow the contours of the object slowly, and allow your pencil or pen to follow along on the paper. However, this time you are able to look at the paper, but not pick up the pen or pencil. You will make judgments about length, size, and proportion, and if you do pick up your pen or pencil, put it back down where you left off. Look more at the object focusing on the contours. As the drawing progresses, you may find the need to back track along lines already drawn or to create a “bridge” to get to a feature within the object. These are both necessary since you are not allowed to pick up your pen or pencil. Continue until you have “traced” all the contours of object and within the object. Your drawing should look more like the object then the blind contour drawing, but it will not be perfect. Since you kept your pen or pencil to the paper and could not erase, the drawing should be a little “off.” Again, accepting the process and not the end results allows you to see the beauty of these drawings. As with the blind contour, the continuous line contours help you train your eyes to really observe an object and hand to record those observations.

Modified Contours

Modified contour drawings are drawings where you are allowed to look at the paper, to pick up your pen or pencil, and to fix your mistakes. But as with the continuous contour drawings, the key is to carefully look at the contours of the object and within the object and to record those observations. But try not to get caught up in making it perfect. Draw what you see. If you are interested in more drawing exercises there are many resources available. We highly recommend to books – Betty Edward’s Drawing on the Right Side of the Brain and Robert Kaupelis’ Experimental Drawing.

Tuesday, May 29, 2007

I AM...


It has become my tradition to make the first page of a new journal an "I am..." page. It's a nice introduction page, and it's interesting to see how I've approached the page in different journals. This page was from a journal that I retired back in October.

A journal is never really complete. But there just comes a time when I am transitioning from the old to the new, and I just no longer work in the older journal. It gets placed on the shelf with all the other retired journals. So, far I'm up to eight retired journals, and I'm slowly wrapping up number nine.

Friday, May 25, 2007

Fun Word Activity

One of my favorite activities is to pick a random dictionary page and browse the words and select a word that I am simply drawn to. I repeat this, and list each word to create a list of juxtaposed words. It is almost like found or Surrealist poetry. I find the strange juxtaposition of words rather fascinating. So, the pages are selected randomly, but I conscientiously pick the words based more on immediate reaction.

The list of words on the left page of this two page spread, was done this way. This spread was created by layering pencil and pen drawing, writing, watercolor pencil, and watercolor. The photograph is a packaging tape transfer of actress Hedy Lamarr. More about that technique in a future post.

Friday, May 18, 2007

Words

For us the thing that separates the visual journal from a sketchbook or art journal is the inclusion of written language as an integral and visual element. The visual journal is the melding of the visual and verbal languages. Words help us to reflect on life and art. They help us process the good, the bad, and mundane of life. Words provide the impetus for thought and reflection. Words help us express ourselves, our intentions, and our feelings. Words provide meaning. Words are powerful.


Beginning visual journalists often have a hard time mixing the written and visual. Below are some easy ways to get words, thoughts, text, writing, reflections, and such into the art and, thus, creating rich pages.


1. Random Words - Pick random words from a dictionary, book, newspaper, magazine, or thesaurus. Write, draw, or stencil the word large on a page.


2. Stream of Consciousness - Write uninterrupted for 7 minutes or 15 minutes or a half hour. Write directly in the journal or on a separate piece of paper. Maybe highlight key words and phrases.


3. Quotes
- Find great quotes, and use them to spark a page.


4. Stencils
- Letter stencils are a quick and easy way to draw words.


5. Cut Words
- Look for big words and phrases in newspaper and magazine headlines. Cut them out an collage them into the journal. Or cut individual letters and collage them in "ransom letter" style.


6. Lists
- Make lists - shopping lists, to-do lists, favorites lists, places-to-go lists, if-I-had-a-million-dollars lists, etc.


7. Prompts
- Pick themes to write about such as "I believe..." "I don't believe..." "I want..." "I need..." "Today I feel..."


8. Found Poetry
- Pick random words from a source and form them into a poem.


9. Printed Text
- Print writings, instructions, or information from the computer, or photocopy book and magazine pages, and glue into a page.


10. Scrabble Letters and Magnetic Poetry
- Glue the actually letters or words into the journal, or make a photocopy of the best words or letters, and collage them in.


11. Take Notes
- Jot down notes from meetings, readings, and what not. Did you learn about a new technique or material? Jot down the details so you don't forget.

12. Rubber or Hand-carved Stamps - Use stamps to stamp in letters, words, and numbers.

13. Questions - Ask yourself a bunch of big, thought-provoking questions, and write them in your journal. Better yet, draw them in or create a Question Page. It's OK not to have answers.

14. Stories - Create stories. Use drawings, photos, or pure color to illustrate the stories. What's your story?

Saturday, May 12, 2007

Layers


Rich and beautiful pages can be built up with layers of simple techniques. This page began with writing I had done on index cards and glued in. Then I used watercolor and watercolor pencil. I often get to a point where I'm not certain what to do with a page, and I'll leave it until months later when I have that one piece of fodder that just seems to fit or something I have done on one page leads to a solution. This page developed slowly over months. Freeing myself to work in this nonlinear fashion has allowed me to have pages that feel more finished.

But it is still all about the process. I rarely have an idea in mind of what I want the finished page to look like. I allow each page to develop it's own way often employing similar techniques from page to page. More and more, I am trying to be more spontaneous, hence the bold words on this page: "Dive In. Throw Down." The idea of "throwing down" in the journal is to really get caught up in the process.

Wednesday, May 9, 2007

Encountering The Blank Page: Part 2

Watercolor pencils have to be one of our favorite media. They have the convenience of colored pencil, but the coverage of watercolor paint. Below are some basic techniques for using the watercolor pencil. If you think of others, leave a comment, and I'll add it to the post.


Watercolor Pencil
1. Activate with water. Simply color down the watercolor pencil and paint water over it. The key is to lay down a lot of pigment, and then paint the water. This allows the color to be rich and to spread a lot.


2. Activate with watercolor paint. Color the watercolor pencil down, and instead of clean water, use watercolor paint. Use a different color to create interesting color blends.


3. Activate with watercolor marker. Color the watercolor pencil down, and use a regular marker, such as a yellow Crayola, to color over the watercolor pencil. The marker picks up a lot of pigment, and this technique will eventually ruin the marker. But they're inexpensive.


4. Dip in water. Dip the watercolor pencil into water and draw or color with it. You may need to repeatedly dip the pencil in water, but it creates a rich color with a slight texture.


5. Draw into wet paper. Paint either clear water or some watercolor paint onto a page, and then use a dry pencil to draw or color into the wet paper.


6. Layering. Use any of the above techniques, and allow it to dry. Then use another color with the same or different technique on top. You can build several layers of watercolor pencil for a page with richness and depth.


7. All-at-once. You might not have the time or patience for layering. So, color several colors at one time, and blend with water.


From Webgrl:
8. Sprinkle watercolor pencil shavings onto wet paper, and smear with a finger.

9. Color with the dry pencil, spritz with a water bottle, and leave it to do its thing.

Saturday, May 5, 2007

Encountering The Blank Page: Part 1

Opening a new journal and staring at the pristine, perfect, blank pages can scare the hell out of even the most seasoned visual journalist. The inner critic rears his or her ugly head and tells us that we're going to mess it up. The problem is that we start focusing on what we want that page to look like when we are finished. We focus on the end product not the process. It is good at times to not think much at all - at least at first. So, by just getting some color down, we can take the blankness away and not worry about the end result. Our habit of working is to work in a nonlinear fashion. We end up starting a lot of pages in some way and then going back and adding more and more things later. There's a lot randomness to this, but it keeps us from thinking about what it will end up like..

One way to begin is with one of the simplest media - watercolor. Below is a list of quick and easy ways to begin pages with out much thought. Experiment and have fun.

Watercolor
1. Paint a page a single color.


2. Paint a page with more than one color.


3. Paint random shapes on a page.


4. Apply the paint with a sponge.


5. Use a toothbrush to flick and stipple the paint on a page.


6. Paint a page with a color or two and sprinkle the wet paint with salt. Let the paint dry and brush the salt off to reveal a texture.


7. Paint objects like bubble wrap, plastic mesh, bottle caps, and cup bottoms and stamp the objects on a page.


8. Paint a page with watercolor and press a piece of wrinkled plastic wrap or a flat piece of bubble wrap into the wet paint, allow the paint to dry, and then remove the plastic or bubble wrap.


9. Paint the watercolor through a stencil - if there's a lot of water, it will bleed giving some unpredictable but interesting results. Use plastic or metal mesh as a stencil.


10. Splatter a page with paint.

The following techniques are from Webgrl:
11. Cut notches and 'waves' into a piece of cardboard box and use it to paint on random shapes.

12. Peel off the cardboard top later and use the wavy bit to stamp on your page (thicker paint gives interesting effects here)

13. Use resist techniques like a crayon or candle (great use for reusing birthday candles). Draw with the wax and then paint over it for a fun effect

14. You can lay random stuff into the paint and pick it up after its dry (just like your plastic wrap etc)

15. Finger paint!

16. Dragging a feather through paint is super cool.

17. Dip some string in paint and drag it over your page. A bit messy but so much fun. If you lay the paint covered string in random shapes and leave a bit hanging out at the top and bottom of your page you can shut the book and weight it down with someone's hand or another book and pull the opposite ends of string till you feel it get taught - when you open your book you get a VERY cool effect. I love doing this with ink.


These techniques and combinations of these techniques can keep you busy for quite some time. In a short time, you could have quite a few pages started. And I'm sure there are other techniques. If you can think of other ways to use and apply watercolor paint, please leave a comment and I'll add it to the list.